Introduction
eSIM is a convenient technology that allows you to use mobile data without a physical SIM card. In this article, we will guide you through the process of installing an eSIM on your iPhone or iPad. By following these steps, you can set up your eSIM in just a few minutes.
1. Preparation: Check SIM Lock Status, Internet Connection, and Device Compatibility
Before installing an eSIM, make sure of the following:
- Your device is unlocked: If your iPhone or iPad is carrier-locked, you may not be able to use an eSIM from another provider. Check by going to Settings → General → About, and look for “Carrier Lock” (it should say “No SIM restrictions” if unlocked).
- You have a stable internet connection: A Wi-Fi or mobile data connection is required to complete the eSIM installation.
- Your iOS device supports eSIM. Generally, the following devices support eSIM:
- iPhone XS / XS Max / XR and later iPad Pro (3rd generation and later)iPad Air (3rd generation and later)iPad (7th generation and later)iPad mini (5th generation and later
2. Prepare Your eSIM
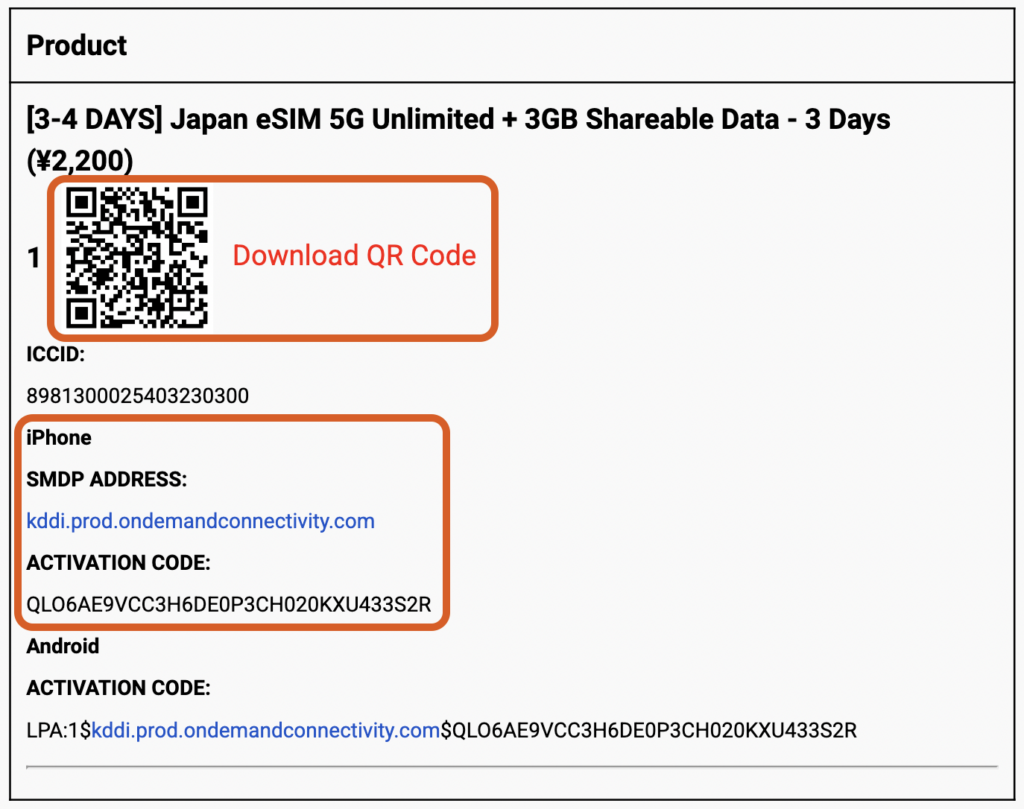
To use an eSIM, you need to obtain an eSIM profile. If you purchase an eSIM from Best eSIM Japan, you will receive the eSIM information via email.

The eSIM profile is typically provided in one of the following ways:
- QR Code (most common) – Simply scan the QR code from the email.
- Manual Entry – Enter the eSIM details such as “SM-DP+ Address” and “Activation Code” manually if needed.
3. How to Install eSIM
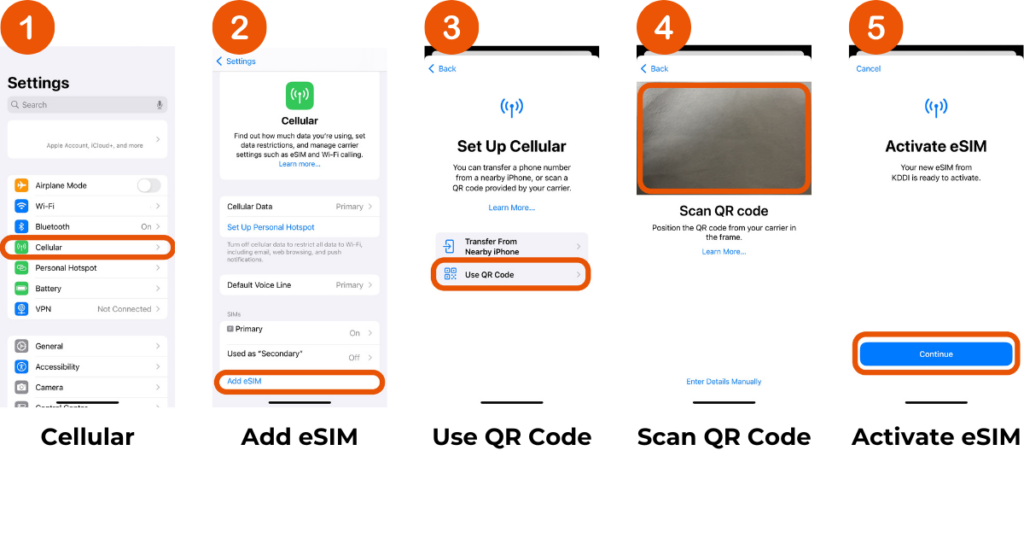
Method 1: Adding eSIM via QR Code

- Open the Settings app and Select “Cellular”
- Tap “Add eSIM”
- Tap “Use QR Code”
- Scan the QR Code sent via email from Best eSIM Japan
- Follow the on-screen instructions to complete the installation
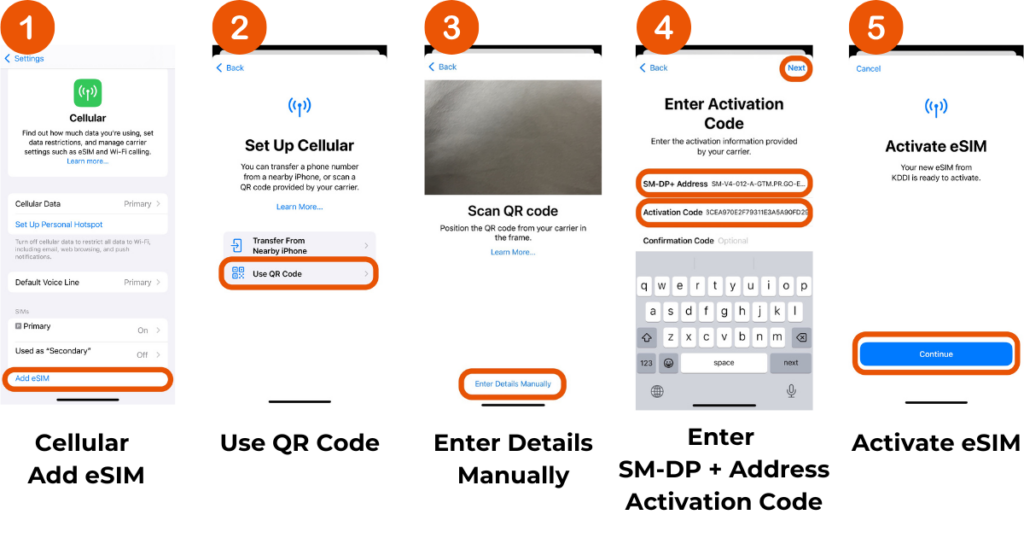
Method 2: Adding eSIM via Manual Entry

- Open the Settings app, go to “Cellular” → “Add eSIM”
- Tap “Use QR Code”
- Select “Enter Details Manually”
- Enter the “SM-DP+ Address” and “Activation Code” sent via email from Best eSIM Japan
- Follow the on-screen instructions to complete the setup
4. Activate Your eSIM
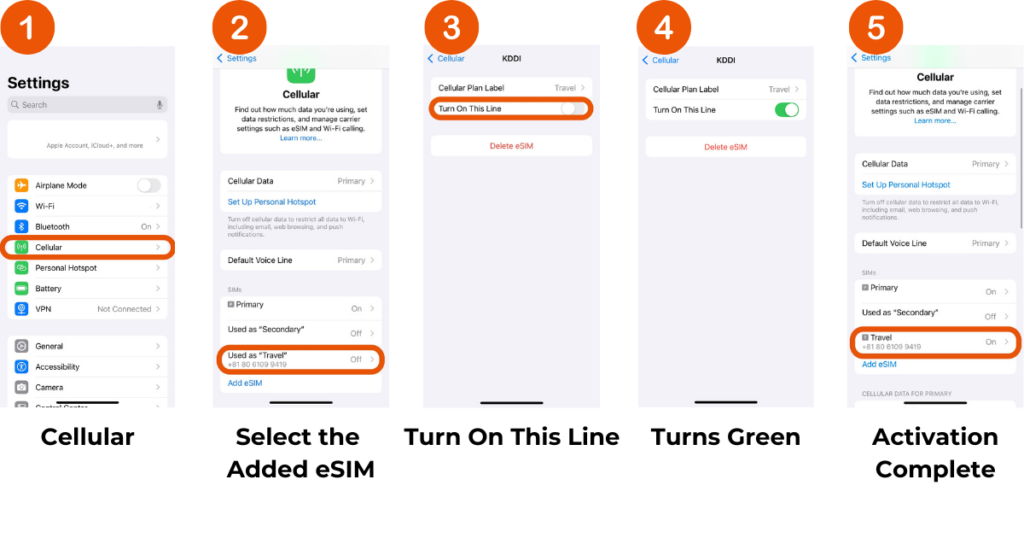
Once the installation is complete, activate your eSIM by following these steps:

- Open the Settings app, go to “Cellular”
- Select the added eSIM plan
- Enable “Turn On This Line”
- If the toggle turns green, it means the eSIM is now ON.
- Once the added eSIM is ON, activation is complete.
5. Day Calculation: Activation Occurs after Arriving in Japan
Activation occurs after arriving in Japan. Even if you turn it on while overseas, it will not be activated. The eSIM will only activate after you arrive in Japan.
The plan’s duration is based on Japanese Standard Time (JST). A “day” is defined as a calendar day from 00:00 to 23:59 JST. For example, if you activate the eSIM at 23:00 JST, the first day will end at 23:59 JST, regardless of the actual usage time. Please note that late activations will result in shorter usage time for the first day.
![[Best eSIM Japan] Day Calculation Based on Japanese Standard Time (JST)](https://japan-bestesim.com/wp-content/uploads/2024/12/【共有】Best-eSIM-JAPAN--1024x538.png)
Enjoy seamless mobile connectivity in Japan with your iPhone or iPad!
Setting up an eSIM on your iOS device is quick and easy. In most cases, simply scanning a QR code is enough to complete the setup. If you encounter any issues, you can manually enter the eSIM details or contact us for assistance.
Enjoy seamless mobile connectivity in Japan with your iPhone or iPad!
